Aufbau eines lokalen Webservers mit CMS zum Rumspielen

Das ist eine Schritt für Schritt Anleitung zur Einrichtung eines lokalen Webservers auf der Basis von Debian 13 und mit dem WordPress CMS, speziell für @HolgerE

Ausgangspunkt

Lokalen Rechner mit dem jeweils aktuellen Debian (zur Zeit Version 13) einrichten. Es gibt ein kleines netinst Installationspaket, bei dem während der Installation alles aus dem Netz geholt wird. Oder ein grosses ISO Paket mit 4 GB, das alle potentiellen Pakete auf dem lokalen ISO Image hat.

:information_source: Debian ist eine Linux Distribution für den professionellen Einsatz als Server. Die voreingestellte Paket-Auswahl ist bewusst minimalistisch. Standardmässig wird nur eine grafische Oberfläche mit den nötigsten Anwendungen zur Administration eines Linux Servers Installiert. Weitere Funktionspakete (z.B. Datenbank, php Umgebung, Webserver) müssen jeweils passend zum Einsatzzweck gezielt nachinstalliert werden. .

LAMP Installation für ein WordPress CMS

LAMP = linux apache mysql php

  1. Lokaler Rechner mit Debian 13
  2. Pakete nachinstallieren, falls nicht vorhanden und anschliessend konfigurieren
  3. Datenbank erstellen
  4. WordPress konfigurieren
  5. weitere Wordpress Funktionen über Plugins bereitstellen (ggf. php Paketliste erweitern)
  6. optional: Einrichten von Port Forwarding auf der Fritzbox
  7. optional: Einrichten von https mit letsencrypt Zertifikaten, falls das WordPress von aussen erreichbar sein soll
  8. optional: Einrichten einer Remote Administration (openssh)

Paketverwaltung und sudo

Sudo erlaubt den temporären Wechsel eines Benutzers mit normalen Rechten in die Rolle „Administrator“ (unter Linux „root“ User genannt). Auf Debian ist sudo aus Sicherheitsgründen nicht automatisch installiert/konfiguriert.

  • synaptic Paketverwaltung, Paketname synaptic
  • sudo für den ersten User einrichten. Paketname sudo. Einrichtung siehe sudo - Debian Wiki

SQL Datenbank

  • mariadb-server, Basiswissen siehe MariaDB & MySQL
  • Datenbank für die Wordpress Website erzeugen
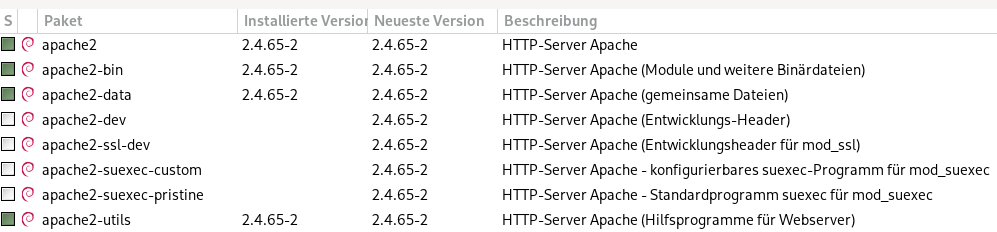
Apache Webserver

:double_exclamation_mark: es darf immer nur ein Webserver installiert bzw. aktiv sein. Typischerweise entweder Apache oder nginx. Hier nutzen wir Apache

php Laufzeitumgebung

WordPress ist in der Programmiersprache PHP programmiert. Deshalb braucht man auf dem Rechner eine Laufzeitumgebung für PHP, bevor man mit der Einrichtung von WordPress starten kann.

Diese php Pakete sollten über Synaptic nachinstalliert werden.

php-common					install
php-curl					install
php-gd						install
php-getid3					install
php-imagick					install
php-json					install
php-mbstring					install
php-mysql					install
php-redis					install
php8.4-cli					install
php8.4-common					install
php8.4-curl					install
php8.4-gd					install
php8.4-igbinary					install
php8.4-imagick					install
php8.4-mbstring					install
php8.4-mysql					install
php8.4-opcache					install
php8.4-phpdbg					install
php8.4-readline					install
php8.4-redis					install
php8.4-xml					install
php8.4-zip					install

:double_exclamation_mark: Es gibt enge Abhängigkeiten zwischen dem Funktionsumfang von WordPress mit den dort installierten Plugins und der php Laufzeitumgebung im Betriebssystem. Je nach Zahl/Typ der in WordPress installierten Plugins können mehr oder weniger php Pakete nötig sein. Daher ist diese Liste nur beispielhaft, es kann sein, dass man sie später erweitern muss.

redis (optional)

redis ist eine In-Memory-NoSQL-Datenbank, die Datenbankabfragen und das Ausführen von php Code cachet und eine Datenbank-gestützte Website deutlich beschleunigen kann. Die Installation ist sehr empfehlenswert, aber für WordPress nicht zwingend nötig. Doku siehe Install Redis on Linux | Docs

WordPress

Das WordPress CMS kann aus Debian heraus mit installiert werden, ist aber ggf. nicht mehr aktuell. Die jeweils aktuellste Version in Deutsch gibt es hier Herunterladen – WordPress.org Deutsch

Weitere Details zu WordPress und wp-cli siehe

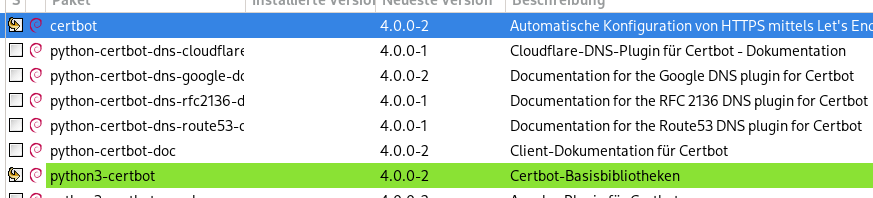
letsencrypt: certbot für https

Letsencrypt ist ein Web-Dienst, der kostenlos https Zertifikate ausstellt. Doku https://letsencrypt.org/ Das certbot Shell Skript aktualisiert die Zertifikate automatisch.

:red_exclamation_mark: Bevor man mit dem Certbot Zertifikate anfordert, muss man zuvor bei einem üblichen Internet Provider (Hetzner, IONOS usw.) einen DNS Namen für seinen Server registriert haben, z.B. meinserver.meinedomaene.de. Nach der technischen Registrierung kann es ein paar Stunden dauern, bis der DNS Eintrag auf alle DNS Server weltweit publiziert wurde.

Remote Administration

ssh und openssh-server

Einrichtung siehe Debian SSH aktivieren: Einfache Schritt-für-Schritt Anleitung

DynDNS und Port forwarding (optional)

:double_exclamation_mark: Nur nötig, falls der Server von aussen erreichbar sein soll. Setzt eine aktuelle Fritzbox mit Fritz!OS 8.x. voraus

DynDNS

Private DSL und Glasfaser Anschlüsse bekommen vom Provider dynamische IP Adressen zugewiesen, die sich jede Nacht ändern können. Damit der Zugriff trotzdem tut, braucht man einen stabilen DNS Namen nach aussen und einen Dienst, der die dynamische IP Adresse der Fritzbox mit dem stabilen DNS Namen verknüpft.

Auf der Fritzbox unter Internet, Freigaben, DynDNS
Doku: FRITZ!Box 7510 | Dynamic DNS in FRITZ!Box einrichten
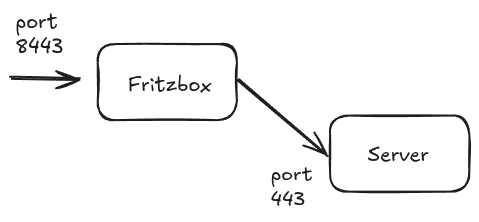
Port forwarding

Auf der Fritzbox unter Internet, Freigaben, Port-Freigaben

:double_exclamation_mark: Eine Port-Freigabe für Port tcp 80 ist unverschlüsselt und sollte nur temporär offen sein **

Im Dauerbetrieb sollte nur eine Port-Freigabe für den verschlüsselten Port tcp 443 (https://) offen sein. Noch besser ist eine Port Freigabe auf einem anderen Port, damit der Port 443 auf der Fritzbox selbst ggf. für Fernwartung genutzt werden kann (Wichtig für https://fritz.com/index.php?id=26292 ). Also nach diesem Schema

Synaptic Paketverwaltung ist schon drauf
Samba ist auch drauf - ich installiere noch SMBCLIENT und die Abhängigkeiten
ssh läuft
openssh-server scheint laut Synaptic P. auch schon istalliert zu sein
mariadb-server hatte ich schon gestern installiert

Apache2 ist auch drauf und scheint zu laufen

/etc/network/interfaces

ist die zentrale Konfigurationsdatei für die Netzwerkkonfiguration unter Debian. Sie enthält alle Netzwerk-Schnittstellen, sowohl für LAN als auch WLAN, ggf. auch temporäre z.B. für VPNs oder solche, die durch Anwendungen wie Docker erzeugt werden (docker0 bridge).

Damit ein Rechner eine Basiskonfiguration per dhcp aus dem lokalen Netz holt, braucht man einen DHCP Server (z.B. Fritzbox), der auf dhcp Anfragen hört und auf dem Linux Rechner diese Konfiguration:

auto <interface_name>
iface <interface_name> inet dhcp

Der Interface_name wird vom Linux Kernel definiert und kann je nach Hardware unterschiedlich heissen. Vom dhcp Server kommt üblicherweise eine IP Adresse (IPv4 ggf. auch IPv4 UND IPv6), die Gateway Adresse (die Fritzbox selber) und einer oder mehrere Einträge für die DNS Auflösung. Die DNS Server stehen wiederum in /etc/resolv.conf. Beispiel

# nameserver config
nameserver 185.12.64.2
nameserver 2a01:4ff:ff00::add:1
nameserver 185.12.64.1
nameserver 2a01:4ff:ff00::add:2

nmcli

nmcli ist die Kommandozeilen App des Network Managers. Network Manager ist die zentrale Administrations-Anwendung für Netzwerke unter Linux. Sie kann über die grafische Oberfläche (also Gnome oder KDE Plasma) oder in der Kommandozeile administriert. Hier stehen ein paar Infos dazu:

Der Hostname eine Linuxservers wird in /etc/hostname eingetragen. Das ist der übliche Standard, aber Windows ignoriert das -wie bei Microsoft üblich- natürlich und hat seine eigene DNS Namens-Mimik. In einem lokalen Netzwerk ist die Fritzbox der DNS Server, also definiert man die Hostnames am besten dort bei „Heimnetz“.

SAMBA Beispieldatei

smb.conf

#======================= Global Settings =======================

[global]

## Browsing/Identification ###

# Change this to the workgroup/NT-domain name your Samba server will part of
workgroup = dvsdnet
# workgroup azureAD

#### Networking ####
# The specific set of interfaces / networks to bind to
# This can be either the interface name or an IP address/netmask;
# interface names are normally preferred
interfaces = 192.168.50.136/8 eth0@if56

# Only bind to the named interfaces and/or networks; you must use the
# 'interfaces' option above to use this.
# It is recommended that you enable this feature if your Samba machine is
# not protected by a firewall or is a firewall itself.  However, this
# option cannot handle dynamic or non-broadcast interfaces correctly.
bind interfaces only = yes

#### Debugging/Accounting ####

# This tells Samba to use a separate log file for each machine
# that connects
   log file = /var/log/samba/log.%m

# Cap the size of the individual log files (in KiB).
   max log size = 1000

# We want Samba to only log to /var/log/samba/log.{smbd,nmbd}.
# Append syslog@1 if you want important messages to be sent to syslog too.
   logging = file

# Do something sensible when Samba crashes: mail the admin a backtrace
   panic action = /usr/share/samba/panic-action %d

####### Authentication #######

# Server role. Defines in which mode Samba will operate. Possible
# values are "standalone server", "member server", "classic primary
# domain controller", "classic backup domain controller", "active
# directory domain controller". 
#
# Most people will want "standalone server" or "member server".
# Running as "active directory domain controller" will require first
# running "samba-tool domain provision" to wipe databases and create a
# new domain.
   server role = standalone server

   obey pam restrictions = yes

# This boolean parameter controls whether Samba attempts to sync the Unix
# password with the SMB password when the encrypted SMB password in the
# passdb is changed.
   unix password sync = yes

# For Unix password sync to work on a Debian GNU/Linux system, the following
# parameters must be set (thanks to Ian Kahan <<kahan@informatik.tu-muenchen.de> for
# sending the correct chat script for the passwd program in Debian Sarge).
:
  passwd program = /usr/bin/passwd %u
   passwd chat = *Enter\snew\s*\spassword:* %n\n *Retype\snew\s*\spassword:* %n\n 

# This boolean controls whether PAM will be used for password changes
# when requested by an SMB client instead of the program listed in
# 'passwd program'. The default is 'no'.
   pam password change = yes

# This option controls how unsuccessful authentication attempts are mapped
# to anonymous connections
   map to guest = bad user

########## Domains ###########

#
# The following settings only takes effect if 'server role = classic
# primary domain controller', 'server role = classic backup domain controller'
# or 'domain logons' is set 
#

# It specifies the location of the user's
# profile directory from the client point of view) The following
# required a [profiles] share to be setup on the samba server (see
# below)
;   logon path = \\%N\profiles\%U
# Another common choice is storing the profile in the user's home directory
# (this is Samba's default)
#   logon path = \\%N\%U\profile

# The following setting only takes effect if 'domain logons' is set
# It specifies the location of a user's home directory (from the client
# point of view)
;   logon drive = H:
#   logon home = \\%N\%U

# The following setting only takes effect if 'domain logons' is set
# It specifies the script to run during logon. The script must be stored
# in the [netlogon] share
# NOTE: Must be store in 'DOS' file format convention
;   logon script = logon.cmd

# This allows Unix users to be created on the domain controller via the SAMR
# RPC pipe.  The example command creates a user account with a disabled Unix
# password; please adapt to your needs
; add user script = /usr/sbin/useradd --create-home %u

# This allows machine accounts to be created on the domain controller via the 
# SAMR RPC pipe.  
# The following assumes a "machines" group exists on the system
; add machine script  = /usr/sbin/useradd -g machines -c "%u machine account" -d /var/lib/samba -s /bin/false %u

# This allows Unix groups to be created on the domain controller via the SAMR
# RPC pipe.  
; add group script = /usr/sbin/addgroup --force-badname %g

############ Misc ############

# Using the following line enables you to customise your configuration
# on a per machine basis. The %m gets replaced with the netbios name
# of the machine that is connecting
;   include = /home/samba/etc/smb.conf.%m

# Some defaults for winbind (make sure you're not using the ranges
# for something else.)
;   idmap config * :              backend = tdb
;   idmap config * :              range   = 3000-7999
;   idmap config YOURDOMAINHERE : backend = tdb
;   idmap config YOURDOMAINHERE : range   = 100000-999999
;   template shell = /bin/bash

# Setup usershare options to enable non-root users to share folders
# with the net usershare command.

# Maximum number of usershare. 0 means that usershare is disabled.
#   usershare max shares = 100

# Allow users who've been granted usershare privileges to create
# public shares, not just authenticated ones
   usershare allow guests = yes

#======================= Share Definitions =======================

[homes]
   comment = Home Directories
   browseable = no

# By default, the home directories are exported read-only. Change the
# next parameter to 'no' if you want to be able to write to them.
   read only = yes

# File creation mask is set to 0700 for security reasons. If you want to
# create files with group=rw permissions, set next parameter to 0775.
   create mask = 0700

# Directory creation mask is set to 0700 for security reasons. If you want to
# create dirs. with group=rw permissions, set next parameter to 0775.
   directory mask = 0700

# By default, \\server\username shares can be connected to by anyone
# with access to the samba server.
# The following parameter makes sure that only "username" can connect
# to \\server\username
# This might need tweaking when using external authentication schemes
   valid users = %S

# Un-comment the following and create the netlogon directory for Domain Logons
# (you need to configure Samba to act as a domain controller too.)
;[netlogon]
;   comment = Network Logon Service
;   path = /home/samba/netlogon
;   guest ok = yes
:;   read only = yes

# Un-comment the following and create the profiles directory to store
# users profiles (see the "logon path" option above)
# (you need to configure Samba to act as a domain controller too.)
# The path below should be writable by all users so that their
# profile directory may be created the first time they log on

;[profiles]
;   comment = Users profiles
;   path = /home/samba/profiles
;   guest ok = no
;   browseable = no
;   create mask = 0600
;   directory mask = 0700

[printers]
   comment = All Printers
   browseable = no
   path = /var/tmp
   printable = yes
   guest ok = no
   read only = yes
   create mask = 0700

 Windows clients look for this share name as a source of downloadable
# printer drivers
[print$]
   comment = Printer Drivers
   path = /var/lib/samba/printers
   browseable = yes
   read only = yes
   guest ok = no
# Uncomment to allow remote administration of Windows print drivers.
# You may need to replace 'lpadmin' with the name of the group your
# admin users are members of.
# Please note that you also need to set appropriate Unix permissions
# to the drivers directory for these users to have write rights in it
;   write list = root, @lpadmin

[public]
path = /shared
public = yes
guest only = yes
writable = yes
force create mode = 0666
force directory mode = 0777
browseable = yes

Top - hab gerade dieses Topic gefunden - schaue es mir heute Abend genauer an.
Schwerpunkt WebServer entsprechend einrichten (mariadb-server??) und WordPress Installation.

grafik

synaptic

@HolgerE das erste Posting auf Aufbau eines lokalen Webservers mit CMS zum Rumspielen ist nochmal ergänzt um eine Paketliste für die php Pakete, die man minimal braucht. Bitte durchlesen und fragen.

Zum Thema Samba Shares hab ich keine Dokumentation im Wiki, die muss noch gebaut werden.